№ 10Photography
One roll at the launderette: 36 AI frames, then stop
Make an AI photo essay from one imaginary roll of 36 frames. Spend the last wash at a fictional launderette, then edit your roll down to six.
№ 06PhotographyHow-to
AI product photography for ecommerce should keep your cup's wonky rim. Build a shop photo set around the real object, with prompts and close visual checks.
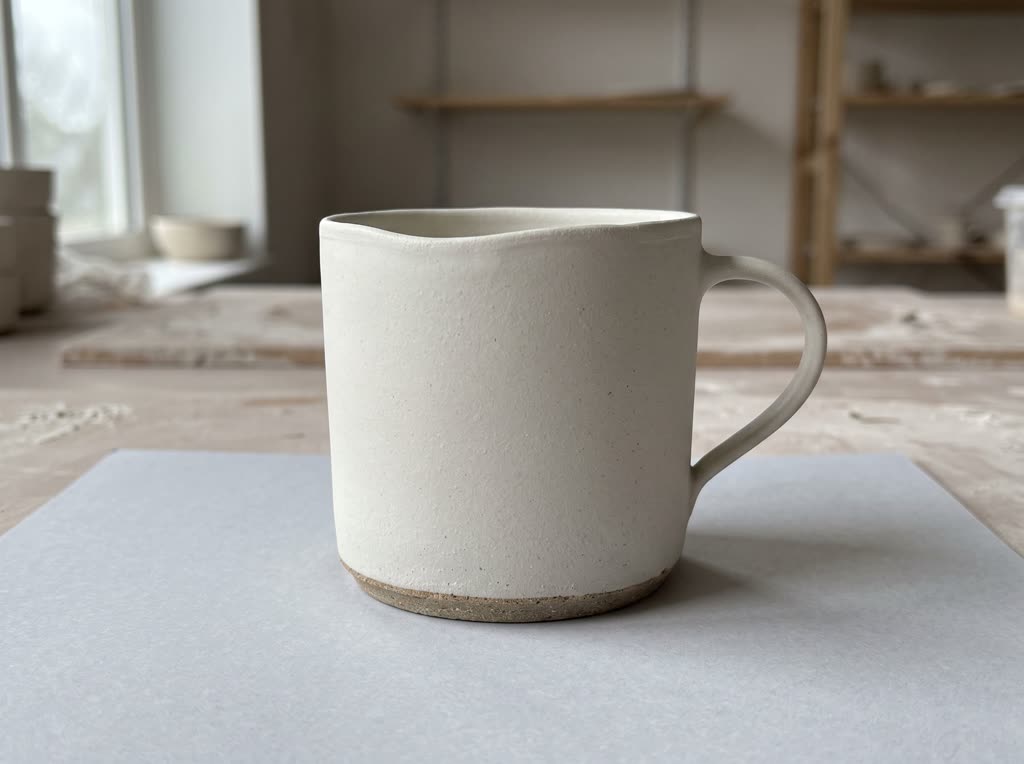
The cup used here has a matte chalk-white finish above a bare unglazed foot ring. Its thin handle sits on the right. The rim dips slightly at the front left.
That small departure from the clean shape is exactly what a modern maker's customer is paying for. If a generated version straightens it, reject the picture even when the lighting suits your page.
For your own shop, start with your own photograph of the actual item for sale. We want enough space around the cup to read its outline. That includes the gap inside the handle and the point where the base meets the surface. Keep an untouched copy of that file beside your working images.
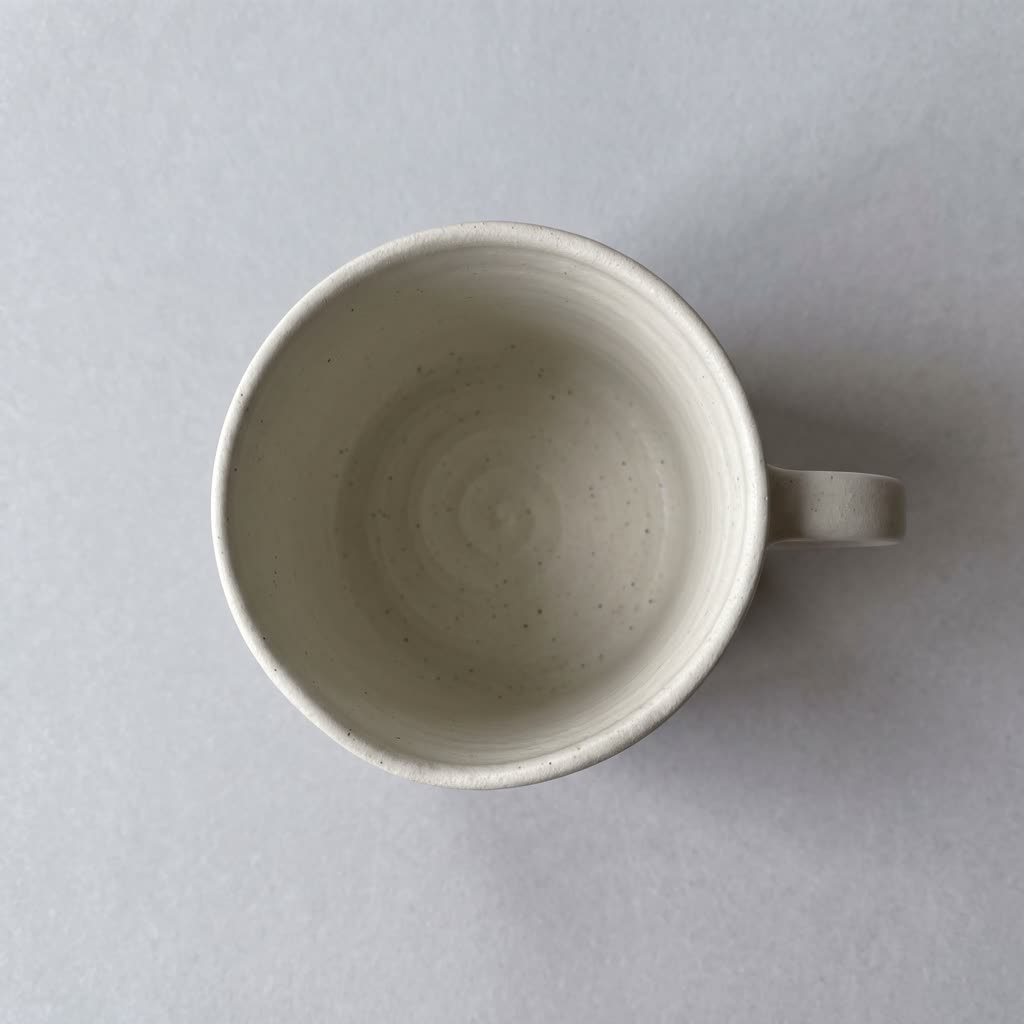
The flat lay needs a photograph taken directly overhead of the same cup. If you want to show the interior glaze, photograph it empty so liquid does not hide the inner wall. A separate close-up is worth taking when the rim is too small to inspect in the wider shot.
Before writing a prompt, note the features that identify this particular cup. The dip in the lip and the boundary above the bare foot ring give you precise places to compare later. The handle needs its own check. Describe only irregularities you can see; adding handmade character to a smooth cup would change the product.
The front and overhead “originals” below are AI-generated stand-ins made with Google Nano Banana 2.1 to demonstrate the method. For a listing, use your own photographs of the actual item for sale.
We would give the clear product view the first gallery slot and let the kitchen scene follow it. That leaves room for atmosphere once the buyer has seen the whole cup. Check your destination's rules before choosing the background; a white backdrop alone does not settle whether an image belongs in a listing.
If you are still choosing the kitchen, sketch the setting with FLUX.2 Klein 4B at 2 credits per run. Leave the product out of this exercise so you can judge the counter space and direction of light without also checking the cup.
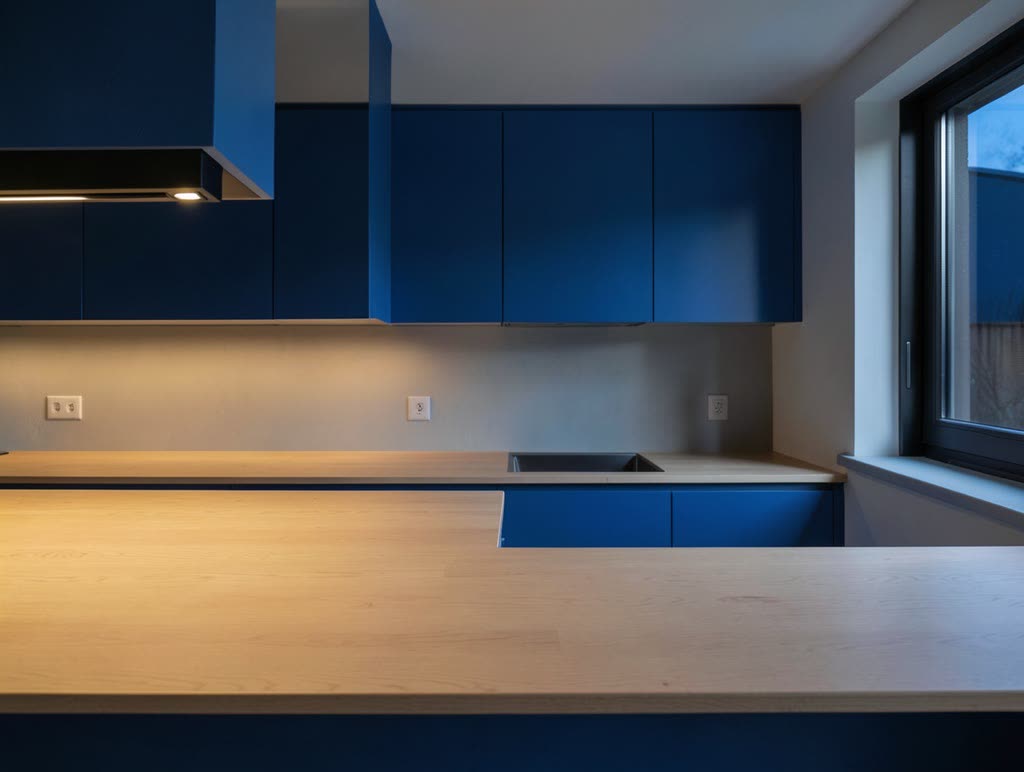
Interior photograph. Wide shot across an empty pale oak counter in a contemporary kitchen at dusk. Frame the counter at cup height with a clear space just left of centre, cobalt-blue flat-front cabinets behind it and a steel-framed window at the right edge. One broad under-cabinet light from the upper left casts a soft-edged shadow along the worktop; the window is dark. Natural colour with warm oak and saturated blue. Everything clean and well kept, matter-of-fact mood. Nikon D850 with Nikkor 24-70mm f/2.8E ED VR at 35mm, f/8, 1/60 second.
The empty counter sketch settles the setting for the coffee pour in #4. Pale oak sits against cobalt-blue cabinets, with a dusk window and under-cabinet light.
Attach your reference separately before running a cup prompt. Let that photograph govern the object if any detail in the wording differs from yours. If your setting idea is still a few rough notes, Prompt Crafter can help turn them into a prompt. Remove any product detail the draft adds beyond your photograph. For help with the wording, see the prompt-writing guide.
The cup edits (#2–#6) were made in the AI Studio on 10 November 2026 using the stand-in sources as references. Each had one run with its named model and the exact prompt shown; prompt rewriting was off.
Use the identical front photograph for both versions below and set each output to 1:1. Try the first with Google Nano Banana 2.1 and the second with OpenAI GPT-Image 2.6 Sunburst, each at 10 credits per run. Keeping the source and wording the same gives you a direct comparison of how each version handles the cup.
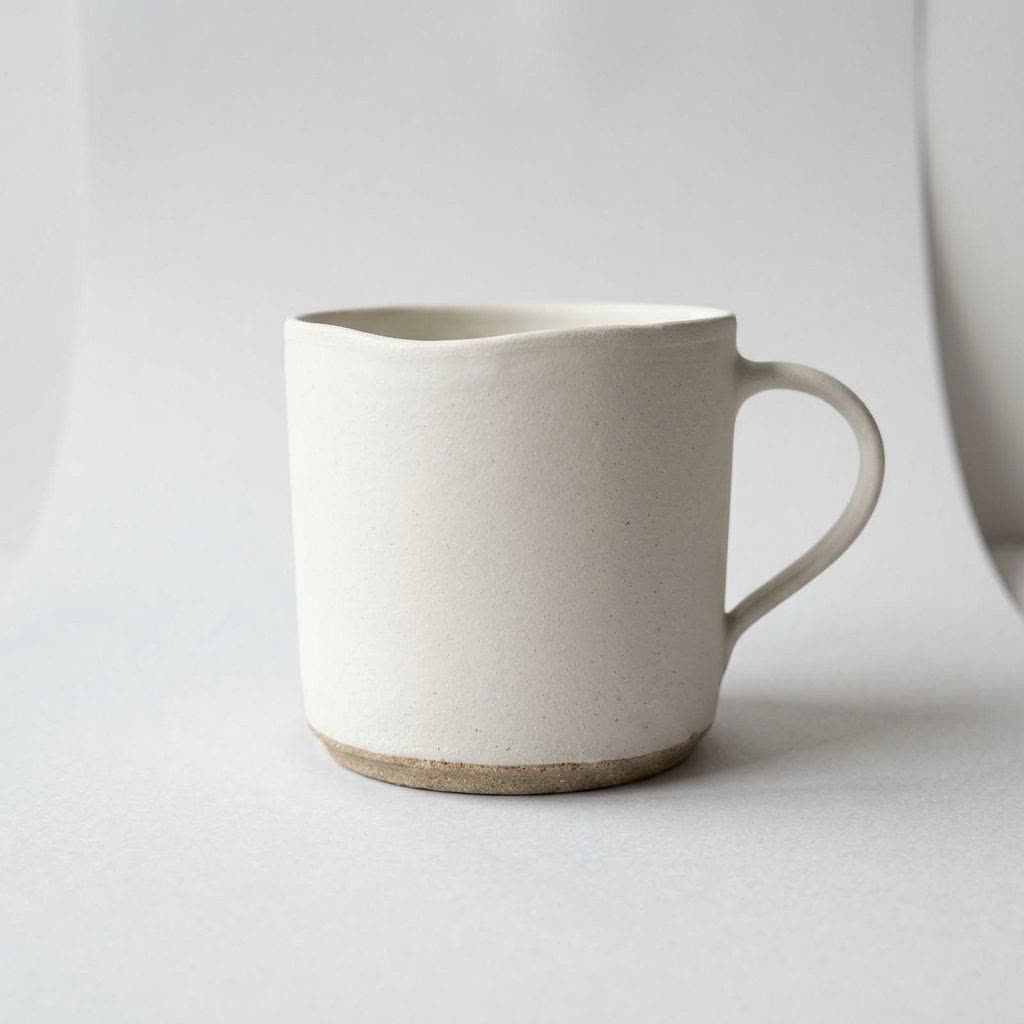
Reference-based product photography. Edit the uploaded front photograph of the straight-sided, minimal handmade stoneware cup in matte chalk white, with a bare unglazed foot ring, a thin handle and a slightly uneven hand-thrown rim as its only irregularity. Keep the photographed viewpoint and the cup's exact outline. The uploaded reference governs the cup's actual appearance. Retain the slightly uneven rim and the exact boundary of the matte finish above the bare foot ring. Preserve the handle opening and its attachment points. Place the cup upright on white matte paper that curves into a plain white backdrop. Keep the cup alone and fully inside the frame with a narrow margin around its widest edge. Use a large diffused light from the upper left with gentle fill from the right. Keep a short contact shadow beneath the base. Neutral colour and restrained contrast, quiet studio mood. Canon EOS R5 with RF 100mm f/2.8L Macro at f/11; keep the complete cup in focus and preserve the surface detail visible in the reference.
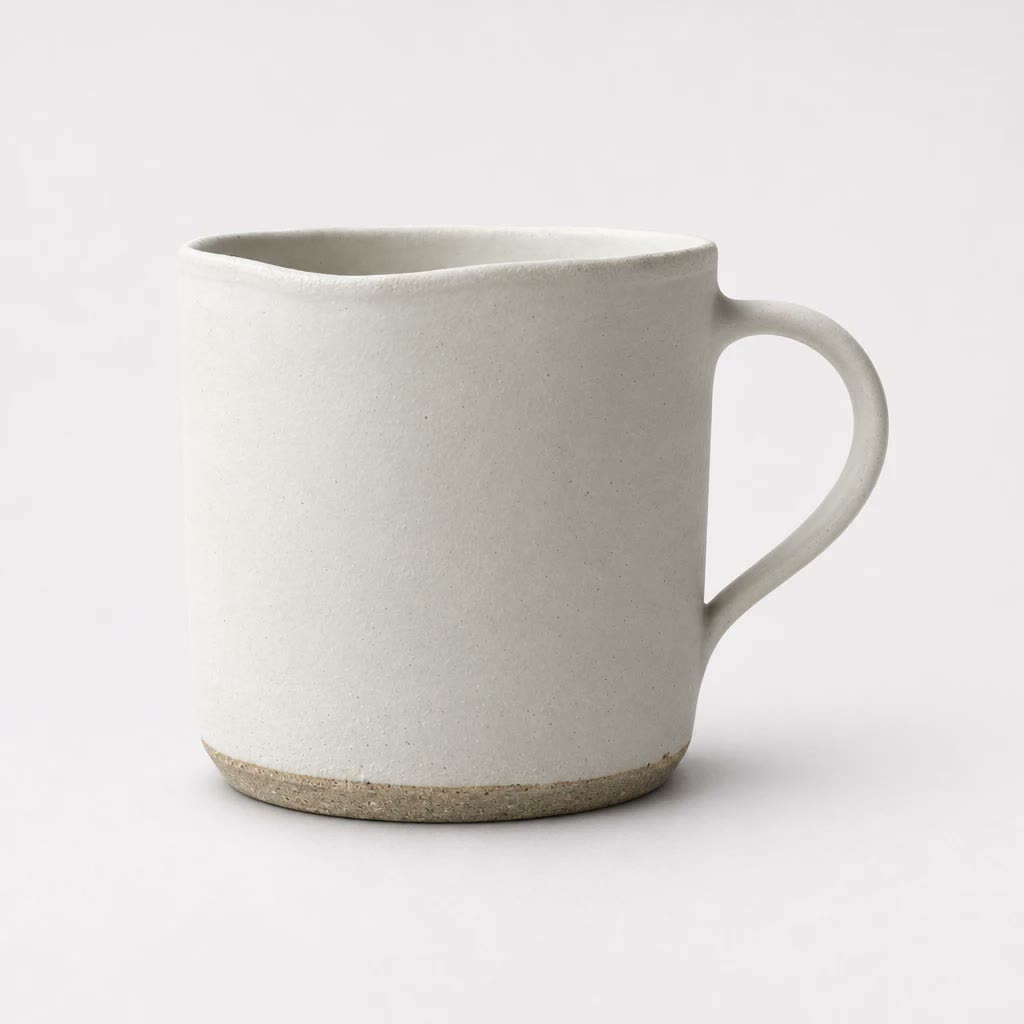
Reference-based product photography. Edit the uploaded front photograph of the straight-sided, minimal handmade stoneware cup in matte chalk white, with a bare unglazed foot ring, a thin handle and a slightly uneven hand-thrown rim as its only irregularity. Keep the photographed viewpoint and the cup's exact outline. The uploaded reference governs the cup's actual appearance. Retain the slightly uneven rim and the exact boundary of the matte finish above the bare foot ring. Preserve the handle opening and its attachment points. Place the cup upright on white matte paper that curves into a plain white backdrop. Keep the cup alone and fully inside the frame with a narrow margin around its widest edge. Use a large diffused light from the upper left with gentle fill from the right. Keep a short contact shadow beneath the base. Neutral colour and restrained contrast, quiet studio mood. Canon EOS R5 with RF 100mm f/2.8L Macro at f/11; keep the complete cup in focus and preserve the surface detail visible in the reference.
We would reject a tidier silhouette if it straightens the real rim. Follow the mouth from side to side before judging the lighting, then inspect the opening inside the handle. Its shape matters even when the outer colour looks familiar.
Enlarge the source and candidate until the rim appears the same width on screen. A shifted foot-ring boundary or invented speckles are reasons to reject the edit. A pale fringe around the outline needs attention too. If both versions change the cup, use the original front photograph in that gallery slot.
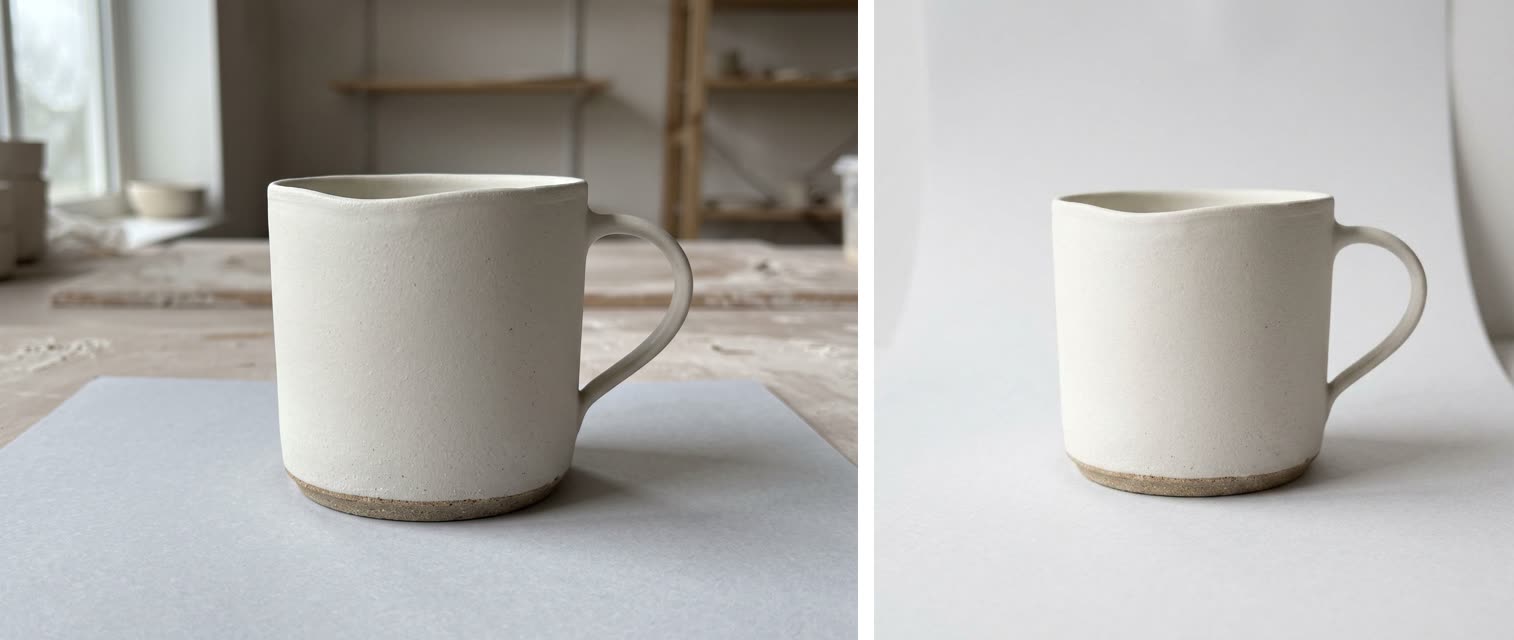
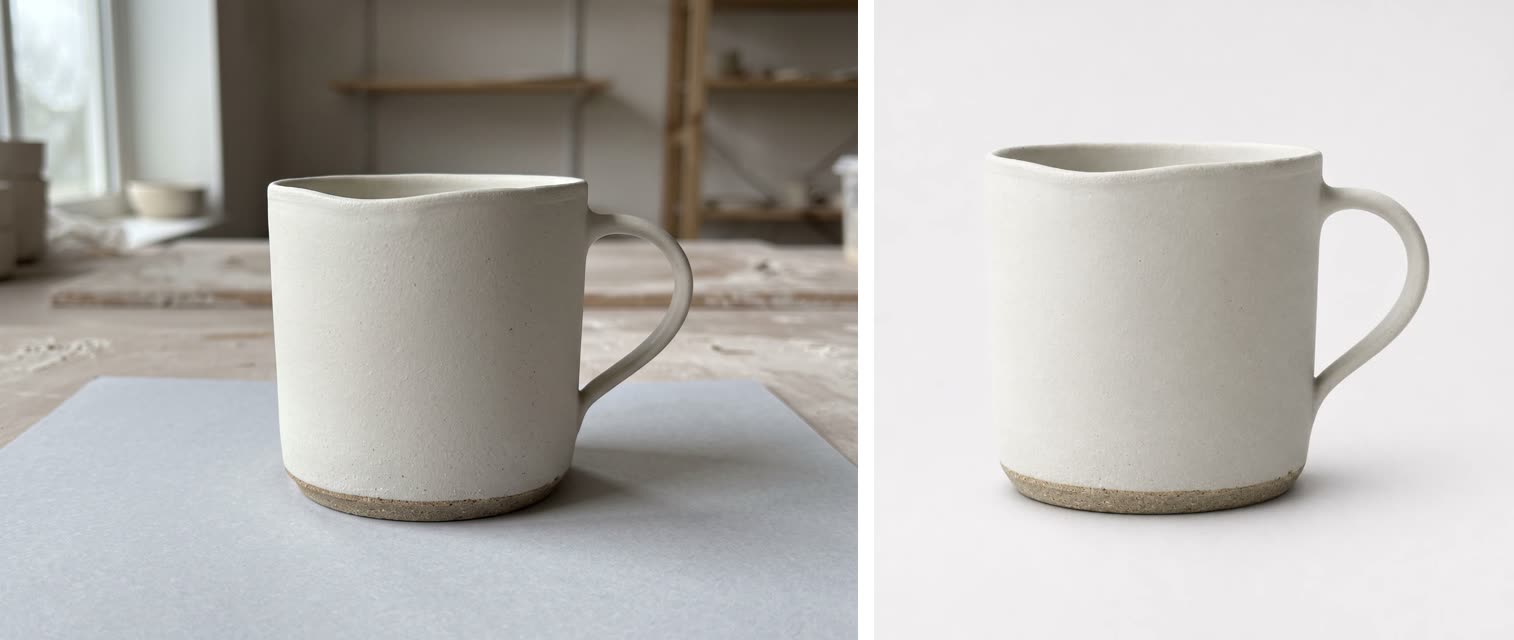
The Nano Banana version (#2) keeps the rim dip at the front left and the bare foot ring. Its thin handle retains the same open shape. Accept the silhouette after cropping off the stray grey curve running down the right edge.
The Sunburst version (#3) also keeps the rim dip and foot ring. The handle opening remains, and the cup sits larger in the frame. Accept this version for the white-background slot.
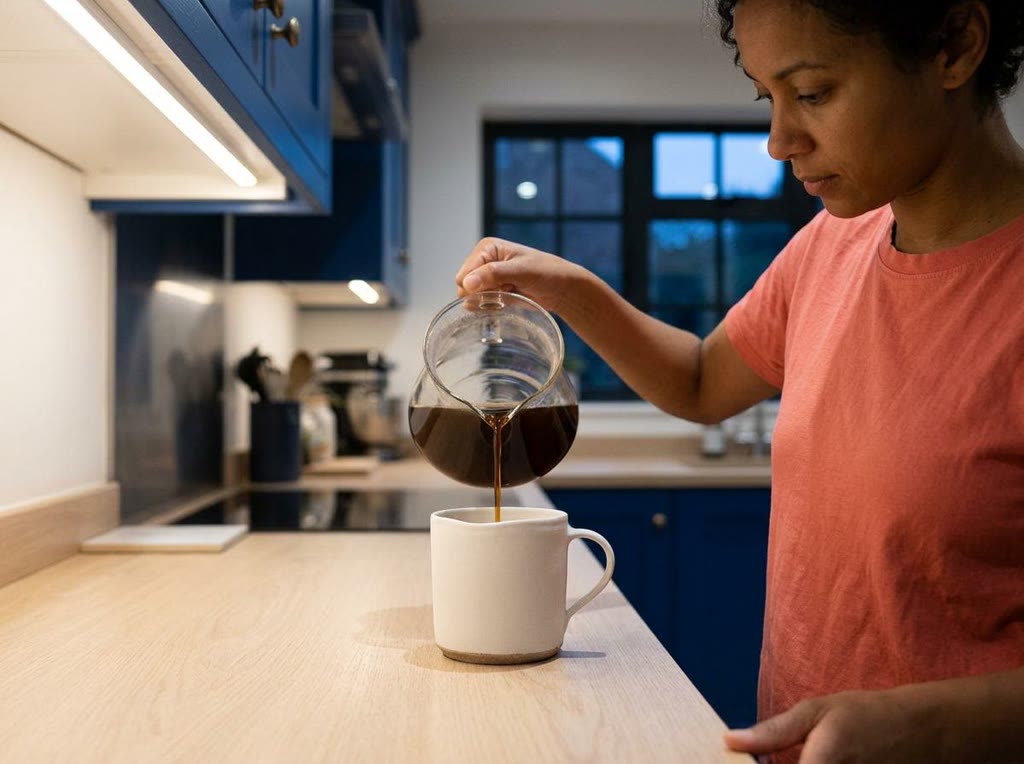
A clean pale oak counter gives this cup enough room. We would show someone pouring coffee at dusk, with a coral shirt against cobalt-blue cabinets. Keep the hand and carafe clear of the cup so its outline and handle remain visible.
The prompt uses your original front photograph again and allows the coffee to change its contents. In the listing caption, state that only the cup is included.
Keeping the photographed viewpoint gives you a visible surface to compare with the source. A new angle asks for parts of the cup that this photograph cannot show. If the other side belongs in your gallery, photograph it first.
Reference-based lifestyle product photograph. Edit the uploaded front photograph of the straight-sided, minimal handmade stoneware cup in matte chalk white, with a bare unglazed foot ring, a thin handle and a slightly uneven hand-thrown rim as its only irregularity. The uploaded reference governs the product's actual appearance. Keep its photographed angle and exact outline. Preserve the rim contour and matte surface, including the foot-ring boundary and handle opening. Place the cup left of centre on a pale oak counter in a contemporary kitchen at dusk. Frame a medium shot of a 35-year-old woman with brown skin and short dark curls, wearing a coral cotton shirt, pouring coffee from a glass carafe into the cup. Show her side-on with eyes on the pour, unaware of the camera. Keep her hand and the carafe above and behind the cup, its full outline readable and its thin handle clear. The coffee stream enters behind the front lip; keep the liquid below the rim. This pour is the only change to the reference contents. Cobalt-blue cabinets and a dark steel-framed window give the kitchen context. One broad under-cabinet light from the upper left casts a soft contact shadow beneath the cup. Natural colour with coral and blue, the chalk-white cup the lightest object. Everything clean and well kept, unposed and matter-of-fact. Nikon D850 with Nikkor 24-70mm f/2.8E ED VR at 50mm, f/8, 1/250 second; keep the whole cup sharp.
The contact shadow should anchor the base to the oak. Compare the matte chalk-white finish with the source on the same screen. Warm kitchen light can affect its appearance, but a glossy surface would change the product. The photorealistic prompt examples offer other ways to describe light when you want to adjust the setting.
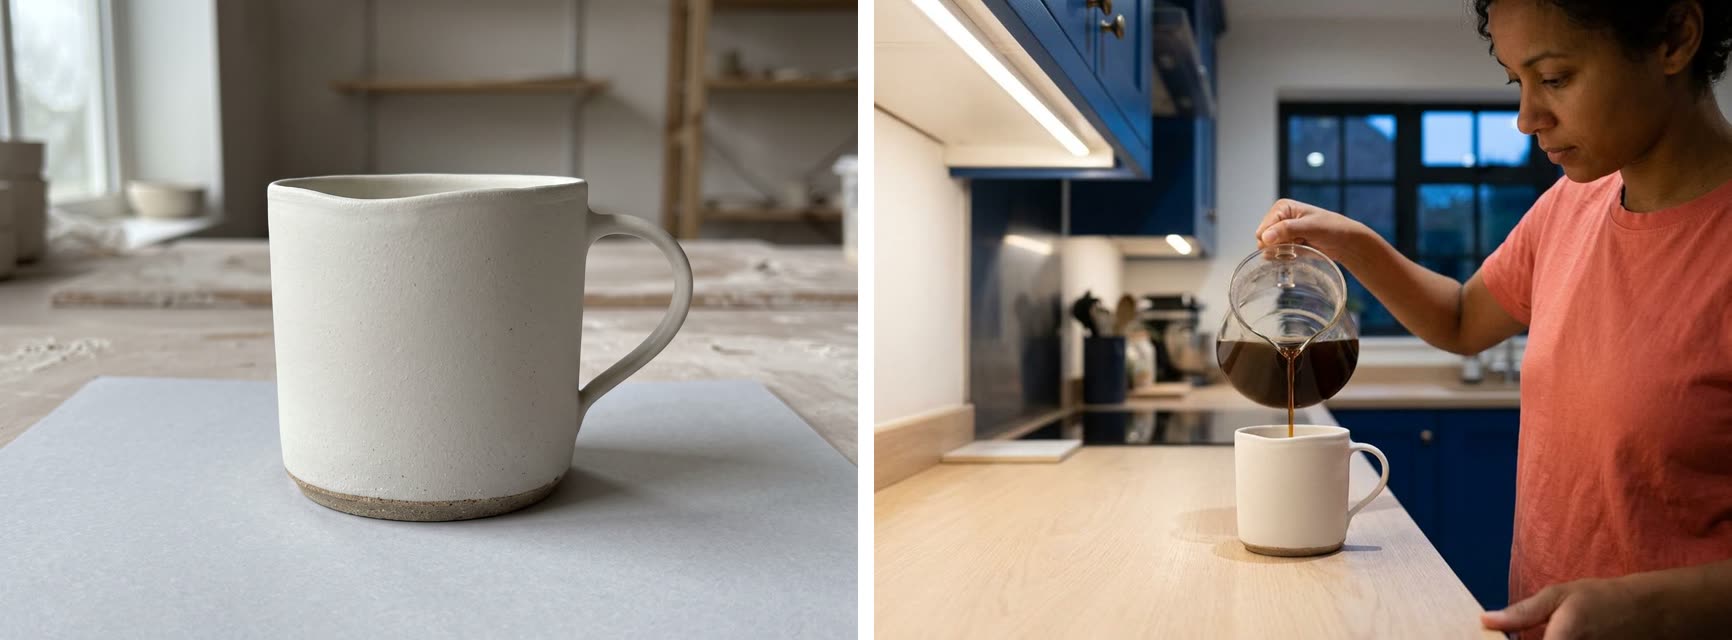
The coffee pour in #4 leaves the cup readable. Its outline and handle match the source. The bare foot ring also matches, and the matte finish reads.
Accept it as a lifestyle image. The rim dip is too small to confirm at this distance, so use another view to show that feature.
We like an overhead view that leaves the mouth easy to inspect. Upload your overhead photograph of the same cup and keep the handle in its photographed position. If you only have a front view, take the overhead photograph before using this prompt; you need a source for the visible interior.
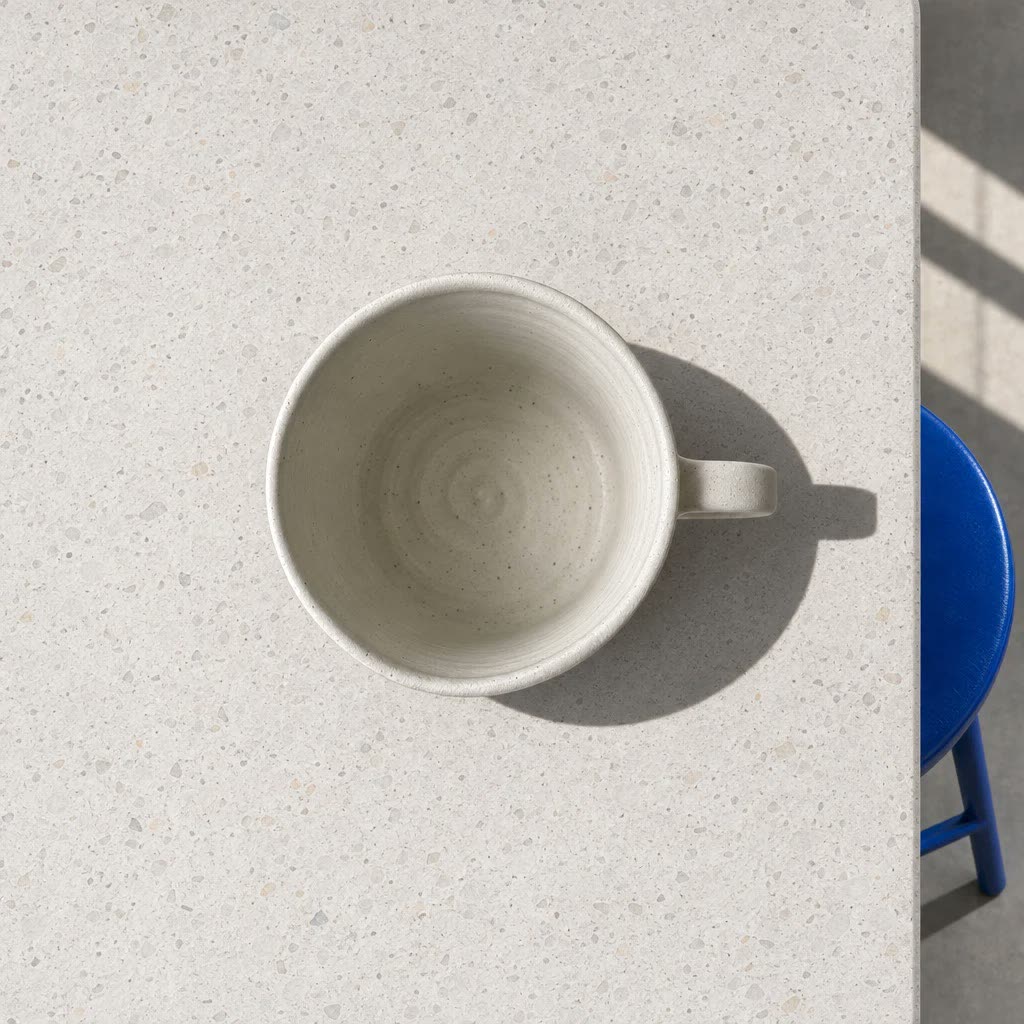
Reference-based flat-lay product photograph. Edit the uploaded overhead photograph of the straight-sided, minimal handmade stoneware cup in matte chalk white, with a bare unglazed foot ring, a thin handle and a slightly uneven hand-thrown rim as its only irregularity. The uploaded reference governs the cup's actual appearance and which parts are visible. Keep the camera directly above it and preserve the exact shape of the mouth. Match the visible interior and contents to the reference. Keep the thin handle's orientation and opening unchanged. Place the cup upright on a clean pale terrazzo kitchen island with its whole outline visible near the centre. Show the edge of the island and a cobalt-blue stool below it at the far right, with ample bare terrazzo around the cup. Hard morning sun through a window on the left casts a crisp shadow to the right; expose for the chalk-white finish so the rim remains readable. Natural colour, blue the strongest colour, matter-of-fact mood. Canon EOS R5 with RF 100mm f/2.8L Macro at f/11, 1/250 second, sensor parallel to the island and the rim in focus all the way around.
The hard morning sun should give the terrazzo a crisp shadow without losing the chalk-white rim in a bright patch. Compare the mouth's width with the body and follow the inside edge for a changed contour. Keep the blue stool at the edge of the frame so it cannot overlap the cup. The overhead prompt asks for the contents to stay unchanged. An empty cup should stay empty.
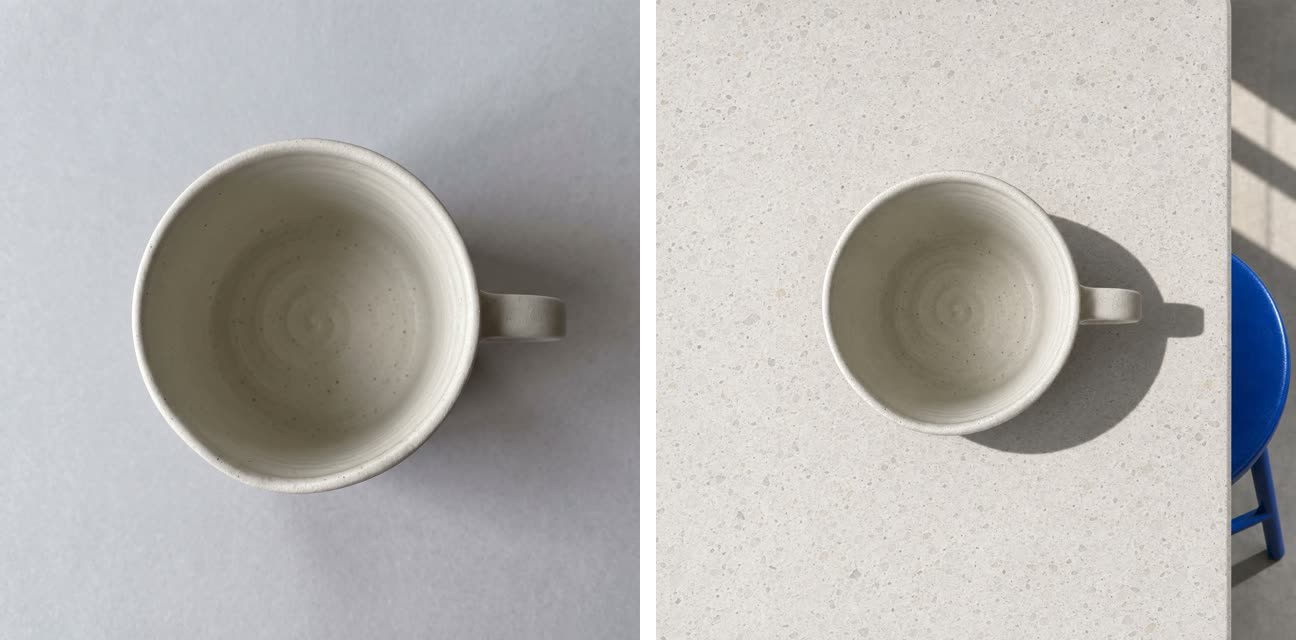
Run #5 places the cup on pale terrazzo in hard sun, with a cobalt-blue stool at the edge. It keeps the throwing spiral inside and the handle to the right. The mouth is rounder and more regular than in the overhead source. Reject this edit for a listing that sells the uneven rim; use the overhead source instead.
For the detail slot, we prefer a plain, sharp source crop to a polished image that changes the surface. Start with a close view of the real rim; if the texture is unclear, take a closer photograph before asking for an edited version. The close-up needs to show what your wider gallery view cannot.
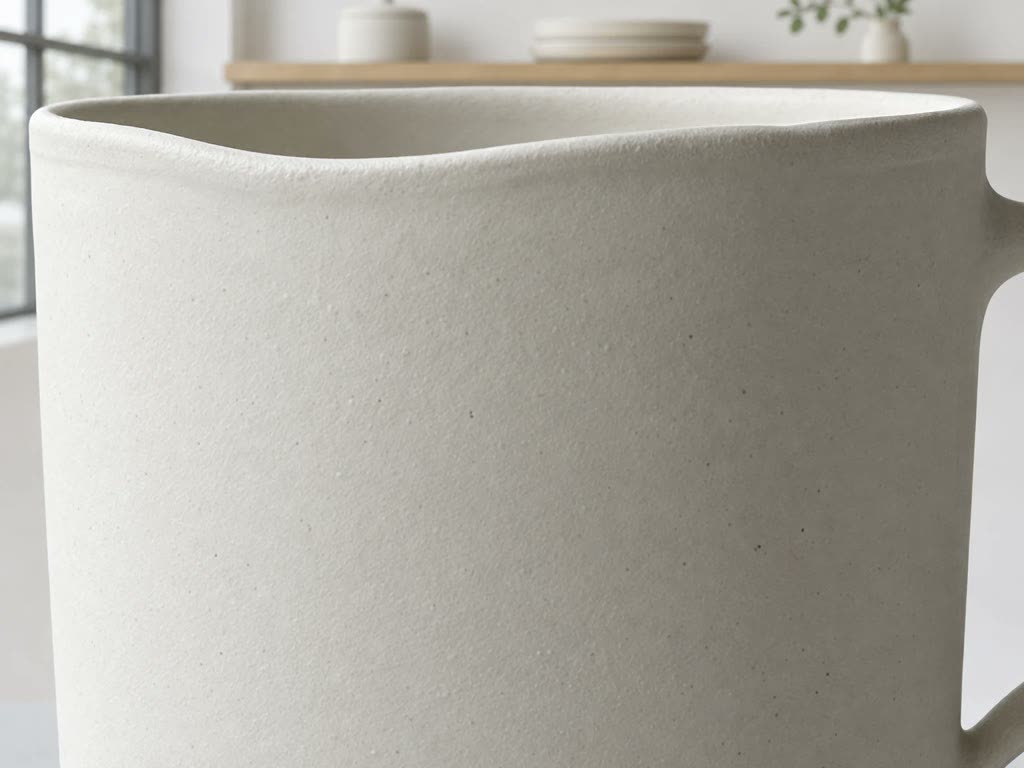
Reference-based product detail photograph. Edit the uploaded sharp crop of the rim and adjacent outer wall of the straight-sided, minimal handmade stoneware cup in matte chalk white, with a bare unglazed foot ring, a thin handle and a slightly uneven hand-thrown rim as its only irregularity. The uploaded reference governs the cup's actual appearance. Keep the exact crop and viewing angle; the original frame supplies every visible part of the object. Preserve the slight dip in the rim and its thickness. Match the matte surface texture exactly. Set the surrounding background in a bright contemporary studio with a pale oak shelf against a white wall, softly out of focus. Bright overcast daylight from a steel-framed window on the left gives the edge a gentle shadow; neutral colour with warmth in the oak. Everything clean and well kept, matter-of-fact mood. Canon EOS R5 with RF 100mm f/2.8L Macro at f/11, 1/125 second, focus across the photographed edge.
The source rim crop here was cut straight from the generated front view, with no AI retouching or enlargement.
Place the untouched crop beside the generated detail at the same displayed rim width. Use the rim's slight dip as a fixed point while you compare its thickness and the matte texture below it. The pale oak shelf can soften into the background; the photographed edge needs to stay sharp. The Promptography article offers more context for using photographic language in your prompts.
Accept the picture only when the visible product features you checked agree with the source. If a feature has changed, mark that area in your working comparison so you can recognise the problem in another version. Keep that image out of the shop gallery.
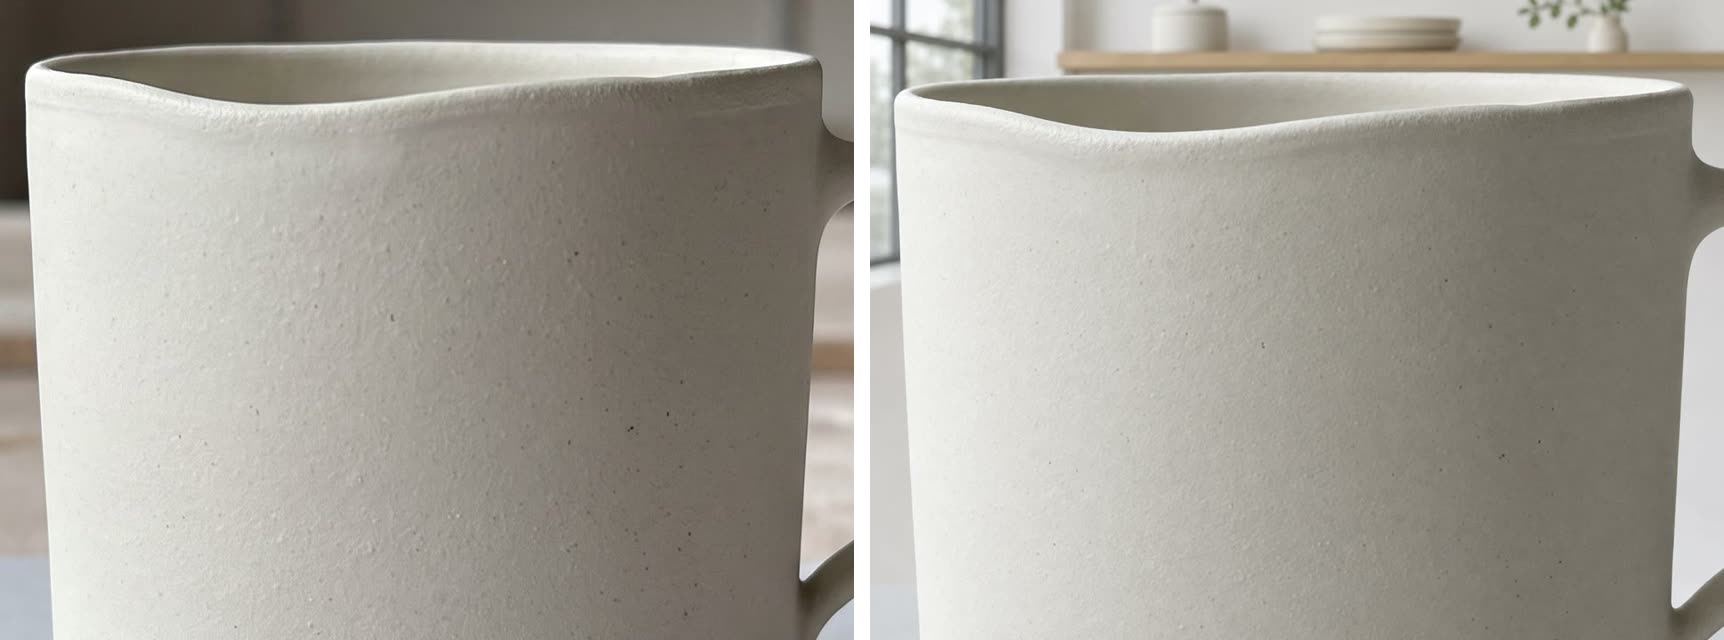
In #6, the dip remains but is broader and smoother. The surface has fewer dark speckles and a smoother texture than the source crop. Reject the edit and keep the source crop for the detail slot.
We judge the final selection in the shop's actual gallery layout. A close-up and a full view have different jobs, and each needs enough room to do its own. Check the phone crop for a clipped handle, then compare each exported file's dimensions and size with your destination's limits above. Save the prompt and model name alongside its reference filename so you can trace an edit later.
For this demonstration, choose #3 for the white-background slot, or #2 after cropping the right edge. Keep #4 for the lifestyle slot. Use the overhead source in place of #5 and the source rim crop in place of #6; both edits are rejected.
The article copies are 1024 px wide JPEGs: #2 and #3 are 1024 × 1024, while #4 is 1024 × 764. The Studio returned the white-background pair at 1024 × 1024 and #4 at 1200 × 896.
The AI-source metadata was not checked. Check it against the Google Merchant Center image specification linked above before an image goes into your feed.
№ 06 · PhotographyAll stories
№ 10Photography
Make an AI photo essay from one imaginary roll of 36 frames. Spend the last wash at a fictional launderette, then edit your roll down to six.
№ 09Photography
AI headshots that look real still need the person’s approval. Use their feedback to make a team portrait they would choose for their own LinkedIn profile.
№ 04Photography
To make AI images look more natural, give people a task. Start with a mechanic adjusting a brake and a runner shaking rain from her cuff.